- MENU
- HOME
- SEARCH
- WORLD
- MAIN
- AFRICA
- ASIA
- BALKANS
- EUROPE
- LATIN AMERICA
- MIDDLE EAST
- United Kingdom
- United States
- Argentina
- Australia
- Austria
- Benelux
- Brazil
- Canada
- China
- France
- Germany
- Greece
- Hungary
- India
- Indonesia
- Ireland
- Israel
- Italy
- Japan
- Korea
- Mexico
- New Zealand
- Pakistan
- Philippines
- Poland
- Russia
- South Africa
- Spain
- Taiwan
- Turkey
- USA
- BUSINESS
- WEALTH
- STOCKS
- TECH
- HEALTH
- LIFESTYLE
- ENTERTAINMENT
- SPORTS
- RSS
- iHaveNet.com: Recipes
by Anne Willan
At an early age back home in Yorkshire, I assumed the duty of roasting turkey. My mother gave me basic instructions (she was never the cook in the family) and left me to it.
You'll find the same basics of oven temperature, timing, seasonings and gravy making in any household cookbook, so I won't repeat them here.
What I want to share are the background tips I've picked up over the years:
Getting Ready

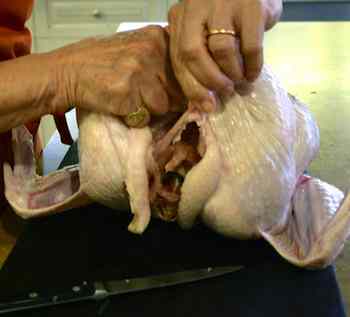
PHOTO 1: Cut out the wishbone so neat slices
of cooked breast can be carved easily
Cut out the wishbone so neat slices of cooked breast can be carved easily. Here's how you do it: lift the neck skin and, using the point of a small knife, outline and then cut out the bone. (So the annual wishbone-snapping contest can take place, you can roast the bone in the pan beside the bird.) (See PHOTO 1.)

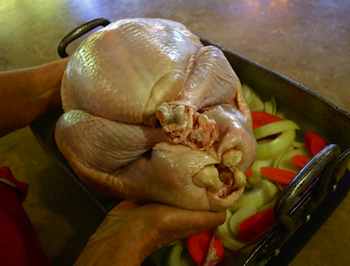
PHOTO 2: Rest the turkey on a bed of onions
& carrots so it doesn't stick to the roasting pan
Use butter for roasting, with a bit of vegetable oil if you wish. Only butter toasts to the wonderful golden brown you are looking for.
So the turkey doesn't stick to the roasting pan, spread two or three thickly sliced onions and carrots in the pan so the bird sits on top. This will also add flavor to the gravy. (See PHOTO 2.)
To tell when the turkey is done, first snip trussing strings on the legs; then rotate the drumstick bones. If they resist, the bird is not ready. Next, poke a two-pronged fork into the thickest part of the leg; the juice should run clear, not pink. Finally insert a meat thermometer down between thigh and breast: it should register 180 F (83 C).
Carving the Bird
You can take two approaches when presenting a whole roast turkey -- either carve in the kitchen or at the table.
Carving in the kitchen is less stressful and certainly less messy. Carving at the table is a wonderful bit of theatre -- the arrival of the shining golden bird, the moment of anticipation when the first cut is made, the competition for favorite morsels. (Who gets the wing, or the "oysters," the tender nuggets lying along the backbone?)
One compromise is to carve the breast in the kitchen and reshape the turkey by replacing the slices on the bone -- the best of both worlds. Just moisten the meat with a little gravy so it does not dry out before going to table.
Sharpen your knife well in advance (see below).
Carve on a board, not on the serving platter; a board is less likely to slip.
Position the turkey legs away from the hand holding the knife and hold the bird steady with a carving fork.
Insert the knife between breast and leg, bend leg outwards with flat of the knife until joint gives way.
Setting the knife blade on the diagonal above the wing joint, cut through and remove the wing.
At the base of the breast, make a horizontal cut through to the breastbone (here's where it is important to have removed the wishbone).

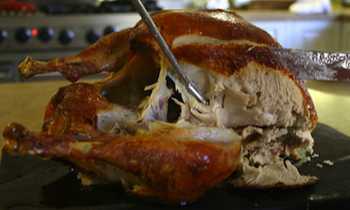
PHOTO 3: Carve the breast meat in slanting slices
parallel to the rib cage, starting at the leg end
& and working
towards the cavity.
Carve the breast in slanting slices parallel to the rib cage, starting at the leg end and working towards the cavity. (See PHOTO 3.)
If carving in the kitchen, I like to stop at this point and replace the slices on the turkey carcass.
To remove the leg, find the joint with the knife, and cut through it.
Cut the leg in half through the joint using the white line of fat as a guide.
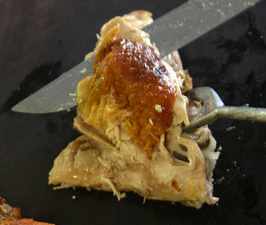
Carve the leg meat off the thighbones and drumsticks, working parallel to the bone. (PHOTO 4)

PHOTO 4: Carve the leg meat off the
thighbones & drumsticks, slicing
parallel to the bone
Sharpening the Knife
Keeping a knife sharp involves two processes: occasional honing and regular sharpening. A blade should be sharpened with a steel each time you use it. (Honing is done with a carborundum stone, either at home or by a professional service.)
To sharpen a blade, hold the knife against the steel at an angle of about 20 degrees. Draw the blade from handle to tip in a rapid motion; repeat the same action on the other side of the blade.
Repeat a dozen times or more until the blade feels keen against the flat of your thumb.
More THANKSGIVING RECIPES
- Turkey Tutorial: Tips for a Perfect Thanksgiving Turkey
- Butterfly and Dry-Brine Your Turkey for Perfect Thanksgiving Feast
- Sage-Rubbed Roast Turkey with Lemon-Bay Gravy
- How to Make Easy Thanksgiving Turkey Stuffing
- Thanksgiving with an Italian Flair
- Thanksgiving Tutorial: Quick Turkey Gravy Recipe
- Thanksgiving Turkey Stuffing - 3 Super Stuffing Recipes
- Chicken-Apple Sausage, Chestnut, Dried Fruit and Nut Stuffing
- Thanksgiving Turkey Oyster Dressing Stuffing
- Cranberry Chutney
- Turkey and Succotash Cream Soup
- Creamy Vanilla Sweet Potatoes
- Sweet Potatoes in Cartoccio
- Cranberry Curd Bars with Walnut Shortbread Crust
- No-Bake Pumpkin Creme Brulee
- Sweet Potato Pancakes
- Pumpkin Pie Bars
- Ginger Creme Brulee
- Deep-Dish Pumpkin Pie with Cranberry Marmalade
- Make-Ahead Turkey Gravy Chills out the Cook
- Get Creative With Thanksgiving Leftovers
- Turkey, Bacon and Granny Smith Apple Salad
More RECIPES ...
Subscribe to Receive our Gourmet Recipes
Article: © Tribune Media Services
"Turkey Tutorial: Tips for a Perfect Thanksgiving Turkey"
Thanksgiving Turkey, Thanksgiving
World-renowned chefs with an extraordinary passion for food share their passion on iHaveNet.com. These chefs make great cooking easier than imagined. Each gourmet recipe features expert advice and an easy-to-make recipe. Exactly what you need to transform your home cooking from acceptable to delectable