By Sean Conway
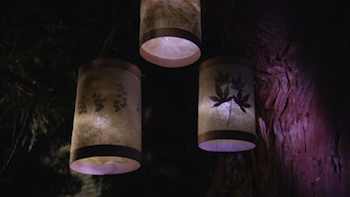
These lanterns, made using Japanese paper and iron-on wood veneer strips, create the perfect setting for a relaxing evening with friends and family
In many Asian gardens, lanterns are used to softly illuminate spaces creating quiet, peaceful settings. They can do the same for your porch, patio or deck, adding to the pleasure of an evening outdoors. On "Cultivating Life" this week, artist/designer Cynthia Treen shows how easy it is to make a simple lantern out of sheer Japanese paper and thin wood veneer.
These lanterns are easy to put together and a great project to share with your children. Iron-on veneer edge banding is used to make the cylindrical structure at the top and bottom of the lantern. With just the heat of an iron to set its adhesive, there is no mess.
These beautiful lanterns are easy to make and will help create the perfect setting for a relaxing evening with friends and family. They are also the perfect way to set the mood for an elegant outdoor dinner party. Either way, they can help you get the most out of your outdoor space.
Detailed instructions and a step-by-step video
To begin, assemble the following materials: iron-on veneer edge banding (about 1 inch wide); sheer, slightly stiff Japanese paper (both white and green); pressed leaves, or other dried plant material; wood glue; tacky white glue; a 12-inch length of 1/8-inch wooden dowel; LCD lights; and some copper wire.
You will also need a cutting blade, a small paintbrush, an iron and ironing surface, two cotton press cloths, a drill with a 1/8-inch bit, and two small clamps.
1. Begin by cutting one piece each of white and green Japanese paper 8 inches long by 19 inches wide. Next, brush the backs of the pressed leaves with tacky white glue and arrange the leaves glue side down onto the green paper. Place the white paper on top of the green paper and match the edges.
2. Set iron to the cotton setting. Cut four pieces of veneer edge banding about 1 inch longer than the width of the lantern. Lay one press cloth onto ironing surface to protect it from adhesive. Lay one strip of veneer edge banding onto the press cloth with the adhesive side facing up. Now lay the long edge of the paper (both sheets) halfway onto the veneer edge-banding surface. Lay another piece of veneer edge-banding, adhesive side down on top of the first, sandwiching the paper sheets between. Lay second ironing cloth over the work and iron the veneer edge banding to heat-set the adhesive and seal the edge. Repeat this process with veneer banding on the opposite long edge of the paper.
3. Now heat both sides of the edge banding again so the veneer and glue become pliable. Bend the veneer and paper into a cylinder and clamp the seam closed with small clamps. Let the veneer adhesive cool for 2 to 3 minutes, and then remove the clamps. With sturdy sheers, trim the ends of veneer to be flush with the paper. Brush wood glue onto the inside seam of the veneer and clamp the seam until it is dry. Remove the clamps and glue the paper seam with tacky white glue.
4. Next, drill two 1/8-inch holes opposite each other in the top edge of the veneer. Cut dowel 1 inch longer than the diameter of the top of the lantern and slip it through the two holes to span the diameter of the lantern. Hang LCD light from the dowel. Wrap a 12- inch piece of copper wire around the dowel where it penetrates the outside of the lantern on each side. Hang the lantern from the wire.
Available at Amazon.com:
Cut Your Energy Bills Now: 150 Smart Ways to Save Money & Make Your Home More Comfortable & Green
It's Easy Being Green: A Handbook for Earth-Friendly Living
Copyright © Cultivating Life by Sean Conway. All rights reserved.
AUTOS | HOBBIES | EDUCATION | FAMILY | FASHION | FOOD & RECIPES | HOME DECOR | RELATIONSHIPS | PARENTING | PETS | TRAVEL | WOMEN
Home & Garden - Set Mood for Evenings on Patio with Homemade Lanterns