By Sean Conway
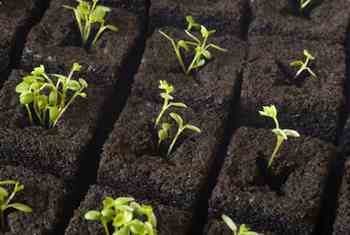
Planting seeds indoors in containers is an inexpensive way to broaden the range of vegetables you can grow in your garden.
In February the sun starts to climb in the sky and almost everyone begins to notice the longer days. It may seem a bit early, but February is the time of year I start thinking about my vegetable garden.
Early in the month I complete my seed orders, and toward the end of the month I begin drawing a plan for the garden on paper.
Mapping out the garden ahead of time helps me optimize my use of space and plan successive plantings. Space allocated to early-season cool-weather crops will be used for warmth-loving plants later on. It also gives me the opportunity to rotate placement of plants from the previous year, to avoid harmful plant-specific pathogens from building up in the soil.
Like many gardeners I get a jump on the planting season by starting seed early. Sowing seed indoors is inexpensive and easy, and it provides an opportunity to grow a wider variety of vegetables, especially those that require a long growing season.
Seed catalogs are an excellent reference source. In addition to the information usually found on the seed packets themselves, catalogs often provide information on specific germination requirements, bloom time, cultural requirements and number of days to maturity.
This information can be very helpful when deciding which seed to start indoors, and when. The correct timing of seed sowing is critical to success. During the cold winter months the desire to start gardening has led many a gardener to sow seeds too early.
Unless grown in a greenhouse with proper temperatures and light levels, most seedlings kept indoors too long will not thrive in the garden.
To get started you will need a few supplies, including clean containers with excellent drainage; sterile, freely draining potting medium; fluorescent lights with proper spectrum bulbs (grow lights), and a location with correct temperature and adequate ventilation.
Begin by purchasing sterile potting medium. This is important to prevent fungal diseases that can cause young seedlings to die shortly after germination.
Choose any container that is at least 2 inches deep. Your local garden center or DIY store will have several options, as well as seed starting kits. Recycled plastic pots from the previous garden season will work, too, provided they are clean and disinfected.
Fill containers with pre-moistened starting mix to within 1/4 inch from top of container. Use just enough water to dampen mix. It should not be soggy.
Tamp down containers to make soil level and to remove large air spaces.
Follow directions on seed packet for depth of planting. Usually, very small seed is sown on top of the soil then misted with a fine spray of water, while larger seed may need to be covered with a fine layer of soil.
Place the containers in bright light and keep the soil evenly moist. Placing the container inside an unsealed clear plastic bag will help keep humidity levels high and prevent the soil from drying out.
Once the seeds germinate, remove the plastic bag and move them under the fluorescent lights for 16 to 18 hours a day. Keep the lights about 6 to 8 inches above the plants. Lights kept further away will result in leggy seedlings.
Grow your seedlings in temperatures close to 70 degrees during the day and, if possible, close to 60 at night. This will help keep the plants compact and encourage strong growth.
Begin feeding your seedlings with a well-balanced water-soluble fertilizer at about one-quarter the strength recommended and apply about every third or fourth time you water.
As the seedlings grow, raise the lights to maintain the 6- to 8-inch distance. Once the seedlings have at least two sets of leaves transplant them into individual pots or cell packs.
© Cultivating Life by Sean Conway
AUTOS | HOBBIES | EDUCATION | FAMILY | FASHION | FOOD & RECIPES | HOME DECOR | RELATIONSHIPS | PARENTING | PETS | TRAVEL | WOMEN
Home & Garden - Jumpstarting Your Garden