By Sean Conway
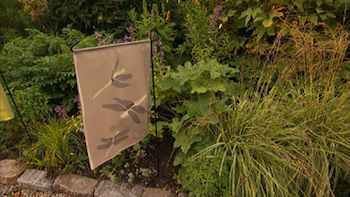
Garden flags are easy to make with lightweight nylon fabric. Decorative motifs inspired by your garden can be cut out and appliqued
In the dog days of summer, nothing is quite so welcome as an afternoon breeze. Gardeners appreciate the wind not just as a respite from the heat but also for the way it moves their plants, adding a whole other aesthetic dimension to their handiwork. Some of the best plants for catching the breeze are grasses, such as Panicum virgatum 'Shenandoah' and '
If your garden doesn't have room for more plants, fly a colorful flag instead. Flags and banners have become a popular decorative element in backyards -- and they're even better when the design is inspired by your own garden. Flowers, leaves and garden insects such as dragonflies are perfect motifs for announcing seasonal changes or events, and these everyday icons are easy to incorporate into a homemade flag or banner.
Artist Deborah Baronas visited the set of "Cultivating Life" to show me how simple it is to make an attractive garden flag for the garden. They can be single- or multilayered, using simple cutouts or appliquéd motifs.
To make your own, you'll need some nylon yardage in assorted colors, fabric glue, vellum, a black marker, and motif patterns such as leaves, drawings or photocopied reference materials.
You'll also need flagpole (iron ones are available at craft and garden stores), common pins, and a smooth, hard work surface such as Masonite. Special tools you'll need include a craft soldering iron with chisel point, a metal straight edge and a triangle.
Start by measuring the width and height of your flagpole; this determines the size of your flag.
Next, using a metal straight edge, measure and draw the shape of your flag onto the nylon fabric with a pencil. Use the triangle for square corners. This is the base cloth for your flag. To allow for a casing for the flagpole, draw a line at the top of the base cloth slightly wider than the diameter of your flagpole, this will be the fold line.
Using the chisel point of your soldering iron and the metal straight edge, trace along the pencil lines. The heat cuts and seals the edges of the nylon at the same time.
Next, take the motif you've chosen for your flag -- this may be a picture or actual foliage from your garden -- and trace your selection onto the vellum with the black marker. If you want the motif to be bigger, enlarge using a photocopier.
Now tape the motif pattern to your work surface and lay nylon fabric in the desired color over it. Cut over the outline of the motif with the chisel point of the soldering iron.
Next, lay out your motif(s) on top of the base cloth and pin in place. Turn the edges over and apply fabric glue along edges of motifs and press down onto the base cloth.
Make the casing for the flag by folding the top edge of the fabric to the backside of the base cloth along the fold line. Glue or stitch along the edge and insert the flagpole.
With a little imagination and some inspiration from your own back yard, you can create an assortment of seasonal flags that will add beauty and movement to your yard all year long.
© Sean Conway
AUTOS | HOBBIES | EDUCATION | FAMILY | FASHION | FOOD & RECIPES | HOME DECOR | RELATIONSHIPS | PARENTING | PETS | TRAVEL | WOMEN
Home & Garden - Blowing in the Wind: Flags for the Garden