By Sean Conway
Hollowed-out coconut shells and easy-to-assemble carnival light hardware can be used to create exotic and festive strings of lights.
As most people know, the food we call coconut is the white interior flesh of the coconut palm tree seed. What may surprise you, though, is how valuable this tree has been to the societies that cultivated it. It has been called the tree of life because it supplies materials to meet so many basic human needs, from food to shelter and much more. Palm fronds are used for thatching roofs and making mats. Coconut shells are used to make bowls, buttons and utensils. They're also ground into a fiber called coir that is added to potting soil to aid drainage.
Whether you love the taste of coconut flesh or hate it -- as with Slim Jim, opinions tend toward the extremes -- if you're interested in craft projects, coconuts offer a range of interesting possibilities. A recent guest on "Cultivating Life," floral designer and set decorator Aaron Caramanas, showed me two innovative projects using coconuts: string lights and candles. Both of these projects would be perfect for a tropical themed party, or for everyday use all summer.
To make the string lights, you'll need 7 to 9 fresh coconuts or coconut shells; about 20 feet of plain brown electrical cord; a paint pen; a set of carnival light sockets with candelabra bases and plug-and-cap hardware; and add-a-tap male and female plug parts (similar to the hardware found on the ends of strings of Christmas lights). You can find all of these things at a hardware or lighting-supply store. You'll also need a large bowl, a drill and 1/4-inch bit, and a chop saw (or hand saw with vice).
Place a coconut in a wide-mouthed cup or bowl with the three "eyes" pointing up. Drill two 1/4-inch holes about 1 inch apart centered on the top of the coconut, then drain the nut of its liquid. Using a chop saw (or hand saw and vice) slice off the non-drilled end of the nut, giving you a cup about 4 inches deep. Remove the coconut meat with a pairing knife. Repeat for all the coconuts
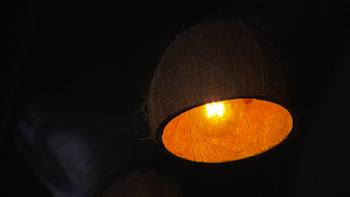
Now prepare the cord. Give yourself about 8 to 10 feet of slack for plugging in the lights, then mark the cord every 18 inches with a paint pen. Weave the cord in and out of the shells, with each pen mark centered inside a cup. Individually attach the lantern light sockets at the pen marks by sandwiching the cord between the plug-and-cap hardware and screwing it together. No splicing is necessary; prongs in the hardware pierce through rubber coating to the electric wiring to make their connection. Just follow directions on the box the hardware comes in.
Attach electric plug and cap hardware to ends of the cord. Again, no splicing is necessary; just follow directions that come with the plugs. Once you've added the bulbs of your choice to the sockets, string lights above your outdoor dining area for a festive tropical feel. (A video demonstration of this project can be found at www.cultivatinglife.com.)
To make a coconut container candle, drain coconut as above and saw the end off with the three eyes. Make another pass with the saw 1 inch in from cut edge, making both a ring and a cup. Remove all the meat.
The ring becomes a perfect support for the cup so it doesn't topple over. Place a primed candlewick in cup. Fill cup with melted beeswax with a few drops of coconut or any other essential oil. Secure wick with a clothespin and chopstick so it remains centered, and let the wax cool. The candle will be ready to enjoy in just a few hours.
© Sean Conway
AUTOS | HOBBIES | EDUCATION | FAMILY | FASHION | FOOD & RECIPES | HOME DECOR | RELATIONSHIPS | PARENTING | PETS | TRAVEL | WOMEN
Home & Garden - Coconut Lights Add an Exotic Touch to Summer Nights