- MENU
- HOME
- SEARCH
- WORLD
- MAIN
- AFRICA
- ASIA
- BALKANS
- EUROPE
- LATIN AMERICA
- MIDDLE EAST
- United Kingdom
- United States
- Argentina
- Australia
- Austria
- Benelux
- Brazil
- Canada
- China
- France
- Germany
- Greece
- Hungary
- India
- Indonesia
- Ireland
- Israel
- Italy
- Japan
- Korea
- Mexico
- New Zealand
- Pakistan
- Philippines
- Poland
- Russia
- South Africa
- Spain
- Taiwan
- Turkey
- USA
- BUSINESS
- WEALTH
- STOCKS
- TECH
- HEALTH
- LIFESTYLE
- ENTERTAINMENT
- SPORTS
- RSS
- iHaveNet.com: Recipes
Nick Malgieri
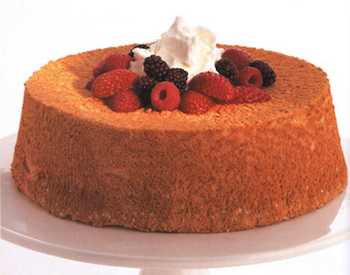
Classic Angel Food Cake
I always giggle when I think of angel food cake because it invariably makes me think of the silliest cliches -- light as a feather, pure as the driven snow, delicate as a cloud.
Cliches notwithstanding, angel food is a great cake. It's not heavy (though you can serve it with some fruit and whipped cream, or a fruit compote as in the recipe here), and you can even eat a piece of angel food cake if you're watching your caloric or fat intake. I don't think it would make it for low-carb diets, but let's face it: Everyone needs a little something sweet once in a while.
Basically a lot of egg whites whipped up with sugar, with flour folded in afterwards, angel food is a pretty easy cake to make. Here are some hints that will make the process foolproof:
The pan:
Use a 2-piece plain aluminum tube pan. (The pan bottom and central tube are one piece and the pan side is the other.) These are usually about 10 inches in diameter and hold about 12 cups. To prepare the pan, wash and dry it thoroughly, but don't grease it, and above all don't use a nonstick pan. In order to bake properly, angel food (as well as some sponge cakes and chiffon cakes) needs to "climb" up the side of the pan while it's baking. This means that it actually sticks to the pan. Don't worry, it's easy to separate the cake from the pan later on with a long, thin knife.
Separating eggs:
It's easier to separate eggs when they're cold. After cracking the egg, pass the yolk ONCE into the other half of the shell -- passing it back and forth repeatedly can cause the yolk to break and ruin the egg whites. Egg whites that have specks of yolk in them won't whip up well -- you'll end up with an angel food pancake.
Whipping egg whites:
Let the egg whites come to room temperature for an hour after you separate the eggs. Whip the egg whites on medium speed, giving them plenty of time to develop a good, stable foam. Once the egg whites are able to hold a very soft peak, increase the speed to medium-high and add the sugar in a slow, steady stream, continuing to whip the egg whites until they hold a soft, glossy peak. Less is definitely better where egg whites are concerned, and you'll wind up with a better cake if the egg whites are a little under whipped, rather than over whipped.
Incorporating the flour:
Sift the flour (usually mixed with some of the sugar) over the whipped egg whites, folding it in, gently but thoroughly, with a large rubber spatula. The most important part of this operation is scraping the flour up from the bottom of the bowl as you cut through with the spatula -- if you don't, much of the flour won't mix in with the batter, causing both lumps and a fallen cake.
Baking the cake:
Once the batter is mixed, it's easy to transfer it to the pan with a large metal kitchen spoon, adding large spoonfuls of the batter next to each other in the pan. Bake the cake until it is well risen, deep golden and feels springy when pressed with a fingertip. If you see the cake starting to shrink away from the sides of the pan, it is over baked -- watch carefully.
Cooling:
Yes, you actually do turn the pan and cake upside down and the cake doesn't fall out! Some pans have feet on the top, so you can just invert the pan to the countertop to cool the cake. Pans that don't have the little feet need to be suspended by the central tube over a bottle -- most wine bottles are perfect for this. Just don't forget to test the pan and the bottle before you fill the pan and bake the cake. By the way, when the cake cools like this, hanging in the pan, it retains its full height. If you left it in the pan in the same position that it bakes in, the cake would collapse and fall.
Unmolding:
After the cake has cooled, turn the pan right side up again and loosen the cake from the side of the pan with a long, thin knife. Lift the central tube out of the pan with the cake stuck to it. Run the knife between the pan bottom and the cake to loosen it. Use fingertips to gently pry the cake away from the central tube at the top, then courageously invert the cake to a platter and remove the pan bottom/central tube.
Serving:
Use a sharp, serrated knife to cut angel food cake, or tear the cake into wedges with two forks, back to back.
Note: The recipe and its variation below use two different approaches for the flour. The plain angel food cake is made with bleached all-purpose flour, while the cocoa-flavored one uses self-rising cake flour. If you can't find self-rising cake flour, use self-rising all-purpose flour.
Classic Angel Food Cake Recipe
Using all-purpose flour for this is a departure from the classic procedure, but works very well. Garnish the cake with berries and whipped cream if you like -- it's always fun to serve fruit with angel food cake.
Makes one 10-inch tube cake, about 12 generous servings
1 1/2 cups sugar, divided
1 cup bleached all-purpose flour (spoon flour into dry-measure cup and level off)
1 1/2 cups egg whites (from about 12 large eggs)
1/4 teaspoon salt
1 tablespoon strained fresh lemon juice
1 teaspoon vanilla extract
One 10-inch tube pan (not non-stick) with removable bottom, ungreased; a narrow-necked bottle to hang the cake on after it is baked
1. Set a rack in the middle level of the oven and preheat to 325 F.
2. Put 3/4 cup of the sugar into a small bowl and set it aside for later. Stir the remaining 3/4 cup sugar and the flour together in a bowl and sift them once onto a piece of wax paper.
3. Combine the egg whites and salt in the bowl of an electric mixer. Use the whisk to whip the egg whites on medium speed until they are foamy. Add the lemon juice and vanilla and continue whipping until the egg whites begin to hold their shape. Increase the speed to medium-high and whip in the reserved 3/4 cup of sugar in a slow, steady stream. Continue to whip the egg whites until they hold a soft, glossy peak.
4. Remove the bowl from the mixer and quickly sift a third of the flour and sugar mixture over them. Gently fold in with a rubber spatula. Repeat with another third of the flour mixture, and fold it in, then end with the remaining flour mixture, folding it in.
5. Spoon the batter into the pan and smooth the top.
6. Bake the cake for 45 to 55 minutes, or until it is well risen, deep golden, and firm to the touch.
7. Remove the baked cake from the oven and invert the pan onto the neck of the bottle. Cool the cake completely.
8. Unmold the cake.
Storage: Keep the cake under a cake dome or loosely wrapped in plastic.
Cocoa Angel Food Cake with Raspberry Compote
Substitute 1 cup self-rising cake flour for the flour, above.
Add 1/3 cup alkalized (Dutch process) cocoa to the flour and sugar mixture, sifting together, as above.
The remaining ingredients and procedures are the same.
RASPBERRY COMPOTE
Two 1/2-int baskets fresh raspberries
1/4 cup sugar
1 tablespoon raspberry liqueur
1 teaspoon lemon juice
For the compote, crush a quarter of the berries and stir in the sugar, liqueur and lemon juice. Gently fold in the remaining berries. Serve a large spoonful with each wedge of cake.
Subscribe to Receive our Gourmet Recipes
FOOD, DRINK & RECIPES [...]
APPETIZERS | SOUPS | PASTA | SALADS | MAIN COURSES | SEAFOOD | CHICKEN | PORK | LAMB | BEEF / VEAL | VEGETARIAN | SIDE DISHES | DESSERT | HEALTHY | WOLFGANG PUCK
The Ins and Outs of Angel Food Cake - Nick Malgieri Cake Recipes
World-renowned chefs with an extraordinary passion for food share their passion on iHaveNet.com. These chefs make great cooking easier than imagined. Each gourmet recipe features expert advice and an easy-to-make recipe. Exactly what you need to transform your home cooking from acceptable to delectable
© Nick Malgieri Recipes